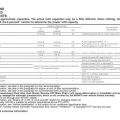
“The ‘M’ has a “DIAGNOSTIC MODE” that is not documented.
Follow these steps to enter [at your own risk] into the diagnostic mode.
– Start Engine [required if you want to see all available diagnostic options]
– Turn OFF the Audio system
– While pushing the SETTING button, rotate the radio’s VOLUME control either clockwise or counter-clockwise 30+ clicks.
– You will then be put into the diagnostic mode.
– Use the BACK button to get to previous screens.
NOTE:
Holding down the SETTING button and rotating the volume knob a 2nd time will put the diagnostic mode into a more “detailed” state offering more options.
——
Diagnostic Mode – CELL PHONE VOLUME
One potential use of the diagnostic mode is to improve the sound quality of your cell phone.
– The diagnostic mode has an option “Handsfree Volume Adjustment”.
– The default setting for this option is “MED”.
– Setting the volume to “HIGH” may improve the sound quality of your bluetooth compatible cell phone.
——
Diagnostic Mode – BACKUP CAMERA
The Diagnostic Mode has an option to adjust the BACKUP CAMERA.
– While cruising in your ‘M’, you can enter the Diagnostic Mode [see above] and go to the “Backup Camera” adjustment screen. When you are in this menu, the Backup Camera turns on.
NOTE:FOr obvious reasons, this is not recommended while driving.
——————————————————————————–
Additional Information
While this mode is accessible to all modifying the setting for the rear camera will have an effect on the operation of the system and should only be done by qualified personal. Other than that the main function of the Confirmation and Adjustments menu are to monitor the AV system and the integrity of the common communication lines. The details vary greatly by year and the best advise that can be given is looking there is great, check the AV comm log, but a false reading does not mean that there is a problem, just a momentary break in communication. This assists technicians while diagnosing advanced or intermittent AV concerns.
A precaution from Infiniti, from the Factory Service Manual.
Multi AV System Diagnosis Functions
There are 2 diagnosis functions (On board diagnosis and Diagnosis using CONSULT-II). It is necessary to use them properly according to the condition. If the on board diagnosis starts, perform diagnosis with on board diagnosis. If the on board diagnosis does not start (because the display is not displayed, the multifunction switch operation is not activated, etc.), perform diagnosis using CONSULT-II.
At on board diagnosis, the AV (NAVI) control unit diagnosis function starts when multifunction switch operation and the AV (NAVI) control unit performs the diagnosis for each unit of system. Then, it displays the
results on the display.
At diagnosis using CONSULT-II, the AV (NAVI) control unit diagnosis function starts when the CAN communication and the AV (NAVI) control unit performs the diagnosis for each unit of system.
On Board Diagnosis
DESCRIPTION
It has Self-Diagnosis mode for conducting trouble diagnosis automatically and a Confirmation/Adjustment mode for operating manually.
Self-diagnosis mode diagnoses AV (NAVI) control unit and communication of each unit composing system, and displays self-diagnosis results. NAVI control unit diagnoses communication with GPS antenna simultaneously.
Confirmation/Adjustment mode is used to monitor the vehicle signals requiring operation and judgment by a technician (malfunctions that cannot be automatically judged by the system), the confirmation/ change/adjustment of setting value, the error history of system, and the communication condition of system.