Overview:
Replacing the stock plastic steering bushing in your column can produce a stiffer, tighter feel and cure any slop that comes from worn or broken oem units.
Difficulty: ***
Time: 2-4 hours
Cost: $30
Tools:
– Ratchet
– 12 mm socket
– 10 mm socket
– Phillips-head screw driver
– Flat-head screw driver (not needed but helpful)
– PB Blaster (optional)
Materials:
– Aluminum Steering Bushing (available through Nico sponsors)
Procedure:
First, as always, disconnect the negative cable from the battery terminal. Lock your wheel by turning it with the keys removed from the ignition.
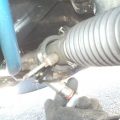
Open your hood and trace the steering shaft to the knuckle where it meets the rack. There are 2x 12mm bolts to remove here. You can mark the knuckle and rack for alignment purposes. Break the connection with the flathead and mallet or hammer. Don’t overdo it, just break it loose.

From here there are a few ways to proceed. While it has been documented that simply lowering the engine crossmember gives enough clearance to work with, this writeup follows the alternate method of removing the steering column and pulling the shaft from the cabin in the interest of being thorough.
From the driver’s side, remove the plastic covers under the column and the upper and lower column covers. There are several Phillips-head screws holding them in place, don’t lose them.
Where the shaft goes through the firewall you will see a large bracket and 3x 10mm bolts. Remove them.

There are 2x 12mm nuts and 2x more 12mm bolts holding the shaft to the column:


Pull these out and make sure not to lose them.
There are several connectors for the portion of the wiring harness connected to the steering column. There should be 6 in all, disconnect them and move them out of the way.
At this point, you can check the knuckle in the bay to assess the ease of movement; it should now move more freely for when its time to pull.
Back in the cabin, a good tug should cause the knuckle to separate correctly.

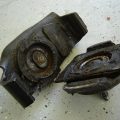
Looking at the back of the shaft where it meets the firewall will clue you in to where the bushing you’re replacing is. There are 2x 12mm bolts securing it. After they are removed, you should be able to separate the shaft.
Look at the bushing and note the location of the plastic rings and metal plates. Remove the last 2x 12mm bolts and the bushing should be ready to replace.
Transfer the rings and plates to the new metal bushing and assemble it in the reverse order from the removal process.
Finished: